什么是网络爬虫
网络爬虫可以按照指定的规则(网络爬虫的算法)自动浏览或抓取网络中的信息,通过Python可以很轻松地编写爬虫程序或者是脚本。
如百度的爬虫,它的名字叫做百度蜘蛛,它是百度搜索引擎的一个自动程序。它每天都会在海量的互联网信息中进行爬取,收集并整理互联网上的网页、图片视频等信息。然后当用户在搜索引擎中输入对应的关键字时,百度将从收集的网络信息中找出相关的内容,按照一定的顺序将信息呈现给用户。
网络爬虫的基本原理
一个通用的网络爬虫基本工作流程如下; 
- 获取初始的URL,该URL地址是用户自己指定的初始爬取的网页;
- 爬取对应URL地址的网页时,获取新的URL地址;
- 将新的URL地址放入URL队列中;
- 从URL队列中读取新的URL,然后依据新的URL爬取网页,同时从新的网页中获取新的URL地址,重复上述的爬取过程。
- 设置停止条件,即在满足停止条件时,停止爬取。
网络爬虫的网络请求
下面给出三种Python实现HTTP网络请求最常见的3中方式:urllib、urllib3、requests.
- urllib模块
1 | # get请求获取百度网页内容 |
- urllib3模块,它用于http客户端的python库
1 | # get实现发送网络请求 |
- requests模块
1 | # get请求 |
Requests库
requests是python的第三方模块,它也是目前公认的爬取网页最好的python第三方库,它很简洁,它的信息可以从http://www.python-request.org获取;
Requests库的get()方法
1 | r=requests.get(url) |
它构造一个向服务器请求资源的Request,返回一个包含服务器资源的Response对象,response包含了网页爬虫爬取返回的所有内容;完整形式如下 requests.get(url,params=None,**kwargs)
params为常用参数,**kwargs为其他控制访问访问参数;
下面给出requests的get方法的源代码
1 | def get(url, params=None, **kwargs): |
我们发现,它的实现用到了requests的request方法,实际上,requests库提供了7个方法,然而包含get的其他六个类似方法的实现,都用到了request方法,
response的status_code用来检测请求的状态码,如果状态码是200说明访问成功,而非200则表明访问失败;response的常用属性如下:
| 属性 | 说明 |
|---|---|
| r.status_code | http请求的返回状态,200表示连接成功,404表示失败 |
| r.text | http响应内容的字符串形式,即url对应的内容 |
| r.encoding | 从http header中猜测的响应内容编码方式 |
| r.apparent_encoding | 从内容中分析出的响应内容编码方式 |
| r.content | http响应内容的二进制形式 |
其中,r.encoding是从http的header中猜测内容编码方式,它不是向r.apparent_encoding一样根据内容进行分析编码方式,它相对来说是不准确的,我们要获取网页内容时,我们将它们输出到控制台上,有时编码不正确,可能会获取中文的乱码,所以我们一般需要看encoding与apparent_encoding是否相同;
request方法
1 | requests.request(method,url,**kwargs) |
method:请求方式
1 | r=requests.request('GET',url,**kwargs) |
1 | kv={'key1':'value1','key2':'value2'} |
它添加了一个字典,被添加到url中,服务器接受这些参数,并根据这些参数筛选一些数据;
对于**kwargs来说,它有13种:
pagrams,data,json,headers,cookies,auth,files,timeout,proxies,allow_redirects,stream,vertify,cert.
爬取网页的通用代码框架
1 | import requests |
网络爬虫引用的问题
网络爬虫的尺寸
| 规模 | 爬取对象 |
|---|---|
| 小规模,数据量小,爬取速度不敏感,Requests库>90% | 爬取网页,玩转网页 |
| 中规模,数据规模较大,爬取速度敏感,Scrapy库 | 爬取网站,爬取系列网站 |
| 大规模,搜索引擎,爬取速度关键,如百度、Google,定制开发 | 爬取全网 |
带来的问题 - 服务器骚扰:服务器默认按人数约定访问能力,爬虫的访问速度比人快的多,将带来对服务器的额外开销; - 法律风险:服务器上的数据有产权归属,爬虫爬取数据进行牟利将带来法律风险; - 隐私泄露:爬虫可以爬取一些网站上的私人信息,它可以破解简单的访问控制能力,获得保护数据从而泄露个人隐私;
Robot协议
Robot协议是来告知网络爬虫,该网站哪些页面可以爬取,哪些不可爬取,它在网站的根目下,有些网站没有Robot协议,代表任何爬虫可以爬取任何数据;
如京东:https://www.jd.com/.robots.txt
它包含两部分User-Agent表示哪些爬虫,Disallowe代表不可爬取的资源;
网络爬虫自动或人工识别robots.txt,在进行内容爬取;网络其实可以不遵守Robots协议,但是存在法律风险
请求headers处理
有时在请求一个网页内容时,无论发现是get还是post以及其他请求,都会出现status_code非200的错误,这种错误多为服务器拒绝了您的访问,那是因为这些网页为了防止恶意采集信息,采用了反爬虫设置,即浏览器根据请求的头部信息判断这个请求是浏览器还是一段爬虫程序发送来的;这时候可以通过模拟浏览器的头部信息来访问;如下:
1 | import requests |
搜索引擎关键词提交接口
百度的关键词接口 http://www.baidu.com/s?wd=keyword 360的关键词接口 http://www.so.com/s?q=keyword 实现
1 | import requests |
网络图片的爬取
https://wx4.sinaimg.cn/mw690/8d05b653ly1g4n0elm7axj20j60b475b.jpg
1 | import requests |
首先打开一个文件,将url返回的内容写到这个路径中,r.content返回的是二进制形式;
类似的还有视频,动画、音频文件等等的爬取
IP地址查询
1 | import requests |
BeautifulSoup的使用
BeautifulSoup的使用
1 | from bs4 import BeautifulSoup |
在一个html文件中,对应一个标签树,而一个标签树对应一个BeautifulSoup类,即一个BeautifuLSoup对应应一个HTML/XML文档的全部内容; 1
2
3from bs4 import BeautifulSoup
soup=BeautifulSoup('<html>data</html>','html.parser')
soup2=BeautifulSoup(open('D://demo.html'),'html.parser')
1 | import requests |
BeautifulSoup库解析器

BeautifulSoup类的基本元素

这里需要注意的是,对于beautiful.tag来说,比如soup.a它是只返回html中的第一个a标签内的内容
1 | import requests |
标签树的下行遍历
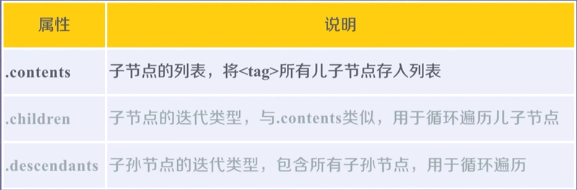

1 | for child in soup.body.children: |
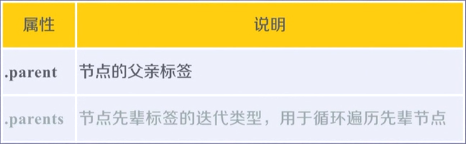
标签树的上行遍历
1 | import requests |
标签树的平行遍历

平行遍历发生在同一个父节点下的个节点间
1 | for sibling in soup.a.next_siblings:# 遍历后序节点 |
爬取天猫Ipad商品信息
1 | import requests |
这里自己第一次亲自,根据html,写出了正则表达式。 待续···